Monday 12 July 2010

How to fix the Facebook & FriendStream issues on the HTC Desire

So you've bought your HTC Desire... It's great isn't it!
But then you realise things aren't working as expected - well... mainly Facebook related.

Here are the problems:
  • FriendStream not automatically or manually updating
  • Facebook-linked contact's photos not updating after being changed
Here's how to fix them:
Note: Nothing is lost during this process. All the contact pictures are replaced automatically.
  1. Settings > Accounts & sync > Facebook for HTC Sense
  2. Tap Remove account
  3. Tap Add account
  4. Tap Facebook for HTC Sense
  5. Enter your Email and Password, then tap Sign In
  6. Wait about 10 minutes
(Contact images started appearing after 2 minutes*)
(All pictures fully replaced and updated after 10 minutes*)

*Over a WiFi connection (~3mbps)

FriendStream on my device has been fine since *touch wood*.
However this is only a temporary fix for the non-updating contact pictures. Hopefully when FroYo is released, this issue will be fixed.

Tuesday 25 August 2009

Improve the performance of your computer (Vista)

Disk Cleanup
Start > All Programs > Accessories > System Tools > Disk Cleanup

Disk Cleanup is a handy tool that allows you to clear your disk of any unnecessary files.

Choose whether you want to clean up your own files or files from every user and then choose the drive you wish to clean up. You then have to choose which files you want to delete. I always select 'Downloaded Program Files', 'Temporary Internet Files', 'Offline Webpages' and 'Temporary Files'. This will help to keep your computer clear.

Clear up a large (GBs) amount of space on your hard drive by deleting old System Restore points. To do this, run Disk Cleanup again and chose to clean up files from every user and then once the scan is finished, go to the 'More Options' tab and click the second 'Clean Up' button.


Disk Defragmenter
Start > All Programs > Accessories > System Tools > Disk Defragmenter

Disk Defragmenter organises files on your computer in order to ease the process of the computer opening a document or running an application for example.

Well to be honest, the Disk Defragmenter that comes with Vista is ****. It has no progress bar, no percentage complete indicator and no graphical inteface that gives you any information as to whether it is running, just started, or is close to finishing.

I now use 'Auslogics Disk Defrag'. This does have a GUI unlike the Vista Disk Defrag and it even tells you the how much faster your computer is after the defrag has been ran! Download it at the following link:
http://www.auslogics.com/en/software/disk-defrag/download


Clear Your Hard Drive
Start > Control Panel > Uninstall A Program

If your hard drive gets full up, when the computer wants to open a document or application, it has to search through many more files than if your computer was empty. Make sure your clear out any programs you don't use:

Also delete, or transfer to an external storage device, any files that you do not need.

If you are having trouble with clearing out space, you can always compress your hard drive.

Start > Computer > 'Right-Click' Harddrive > Properties > Compress this drive to save disk space > Apply


Run a Anti-Virus Scan
Many viruses will slow down your computer. Make sure you have an up-to-date anti-virus program and run regular virus scans.


Reduce Windows Appearance and Effects

Start > Control Panel > System and Maintenance > Performance Information and Tools > Adjust visual effects

Windows has many visual effects that you may or may not notice. Turning off these effects will improve the speed of your computer without drastically changing anything.

Clicking 'Adjust for best performance will turn all of the effects off. If you are a more advanced user you can select the effects you want to turn off. Animating windows, fades and slides and transparency I turn off simply because they are not needed.


Restart once in a while if you Hibernate your computer
When you hibernate your computer, it will save the current activities of your desktop to the harddrive and then it will shutdown, therefore making it much faster to boot because it doesn't have to load everything again. Normally, when you shut down your computer, the temporary files and the cache is cleared. These files are created by Windows in order to make you computer run faster, which is an advantage. But they come as a disadvantage if you hibernate instead of shutdown. The temporary files and cache soon get clogged up and slow down your computer.

To fix this, simply shutdown once in a while. The best time is probably when an update requires a restart.


Close Programs you are not using
Having lots of programs open at once can severely slow down your computer. Close any programs that you have open that are not needed and stop any music from playing (use your hi-fi). If you are a more advanced user you can exit any unneeded Processes from running in Task Manager (Shortcut: Ctrl+Shift+Esc > Processes).


Change your Power Plan
If you are working on a laptop, try changing your Power Plan to its maximum. I have 'High Performance', 'Balanced' and 'Powersaver'. You can really see the difference between 'Powersaver' and 'High Performance' even when opening a simple text document or an internet browser.


Remove a CD from the drive
Simply removing a CD from your drive will speed up your computer. Test it yourself! Put a CD into the drive, let it rest and then open My Computer. It takes a long time to load because the computer is trying to search the CD for the name and the thumbnail. Try opening My Computer without a CD in the drive and see the difference.

If you have any questions or queries feel free to leave a comment!

Friday 6 February 2009

Flash - Walls

How to create walls to use with movieclips using very simple ActionScript.

1. Open Flash and create a New Document.

2. Use the Rectangle Tool (R) and draw out a square (50x50 pixels).

3. Select it using the Selection Tool (V) and then Convert it to a Symbol (F8). Name it "square", make it a MovieClip and the Registration centred. Now, with the square selected, open up the Properties panel and give it an Instance Name of "square".

4. Next, open up the Actions panel (F9) and enter the following ActionScript:
onClipEvent(enterFrame){
if(Key.isDown(Key.RIGHT)){
this._x += 10;
}
if(Key.isDown(Key.LEFT)){
this._x -= 10;
}
if(Key.isDown(Key.UP)){
this._y -= 10;
}
if(Key.isDown(Key.DOWN)){
this._y += 10;
}
}

Explanation

if(Key.isDown(Key.RIGHT)){ - if the Right Arrow key is pressed
this._x += 10; - move the square 10 pixels to the right
._x + - ...is the horizontal axis, so if you move along the x-axis in a positive direction, you move to the right
._y - - the y-axis is different on Flash (don't ask why!) so if you move along the y-axis in a negative direction, you move upwards and vise versa.

5. Now you need to create the walls. You can use any kind of shape for this but it much simpler to use lines. Select the Line Tool (N) and draw out a square. You could also use the Rectangle Tool to draw the square and then delete the fill.

6. You now need to make each wall a MovieClip. First select the top wall and hit F8 to convert it to a symbol. Name it "WallTop", leave the Type as MovieClip and the Registration as centred. Do the same for "WallBottom", "WallLeft" and "WallRight".

7. Enter the following Actionscript to each individual wall:
WallTop
onClipEvent(enterFrame){
if(this.hitTest(_root.square)){
_root.p1._y += 10;
}
}

WallBottom
onClipEvent(enterFrame){
if(this.hitTest(_root.square)){
_root.p1._y -= 10;
}
}

WallLeft
onClipEvent(enterFrame){
if(this.hitTest(_root.square)){
_root.p1._x += 10;
}
}

WallRight
onClipEvent(enterFrame){
if(this.hitTest(_root.square)){
_root.p1._x -= 10;
}
}

Explanation

if(this.hitTest(_root.square)){ - if the square touches 'this', the top wall in this case
_root.p1._y += 10; - move the square down 10 pixels
This works because the wall is pushing the square away at the same rate that the square is moving. If you were to increase the speed of the square to 11, it would slowly, but eventually, move through the wall. So if you plan to change the speed of the square, make sure you also change the value of the wall's pushing force.

8. Test your movie (Ctrl+Enter).

If you want the walls to be invisible just change the colour to match the background.
Have fun!

Flash - Water Droplet

How to create an authentic looking water droplet using masks and filters.


1. Open Flash and create a New Document.

2. Find a picture you want to use as your background. I am using this picture of a leaf. Import it into the Library and then drag it onto the stage. Adjust the stage size so that it is the same size as the picture and then ensure that the picture is centred on the stage (Ctrl+K then align). Name the layer "Bkg".

3. Create a new layer called "Mask". On this layer you need to draw the water droplet. I used the Oval Tool to create a circle then squashed the bottom.


4. Select the droplet you just made and copy it. Create a new layer called "WaterDroplet" and paste the droplet in place (Ctrl+Shft+V). Drag the "WaterDroplet" layer so that it is in between the "Mask" layer and the "Bkg" layer.

5. Right-click on the "Mask" layer and click 'Mask'. Then hide the "Mask" layer, unlock the "WaterDroplet" layer and lock the "Bkg" layer.


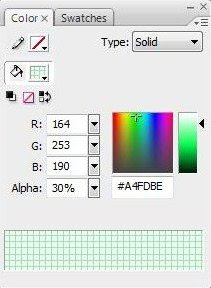
6. You now need to add some colour to the droplet. The colour you choose is important in making it look realistic. Select the droplet on the "WaterDroplet" layer you have just unlocked. Determine the root colour of the background underneath the droplet. So, in this example it will be a bright green (settings shown in image below). Fill the droplet with the Paint Bucket Tool (K) with the colour selected. Now reduce the Alpha to 30%.


7. Convert the droplet to a movieclip (F8) and then name it "Droplet".

8a. Now we are going to apply several filters to make it look like water. First, add a Bevel with the following settings:


Blur X: 20
Blur Y: 20
Strength: 200%
Quality: High
Shadow: #66CC00 (Alpha: 50%) THIS ALSO NEEDS TO BE A SIMILAR COLOUR TO THE BACKGROUND!
Highlight: #FFFFFF (Alpha: 0%)
Angle: 225
Distance: 25
Type: Inner

8b. Add another Bevel.


Blur X: 20
Blur Y: 20
Strength: 200%
Quality: High
Shadow: #CCFFFF
Highlight: #CCFFFF
Angle: 45
Distance: 25
Type: Inner

8c. Then add a Drop Shadow.


Blur X: 2
Blur Y: 2
Strength: 100%
Quality: High
Colour: #000000 (Alpha: 50%)
Angle: 225
Distance: 20
Inner Shadow: YES

8d. And another.


Blur X: 5
Blur Y: 5
Strength: 1000%
Quality: High
Colour: #000000 (Alpha: 25%)
Angle: 45
Distance: 5

9. Add a small oval onto the water droplet in the same direction as the light source and angle it appropriately. Fill it with a Radial Fill (White - Alpha: 100% & White - Alpha: 0%). Convert it into a movieclip and give it a High quality Blur of 5 for X and Y. Place it on the "WaterDroplet" layer above the water droplet itself.

10. There you have it, a nice looking water droplet! I have also added a slight blur on top of the previous filters to give it a softer edge. If you do this you will also need to make the droplet on the "Mask" layer slightly larger so that the blur isn't cut off.

free counters

Flash - Countdown Timer

Flash - Countdown Timer

This is my first Flash tutorial. It will teach you how to create a timer that can be used within many aspects of Flash. Here we will be using it to count down to 0 then the movie will play.

Just as a note for any future Flash tutorial posts: I work on Adobe Flash CS3 Professional and I code in ActionScript2.0. Unless told otherwise, presume I am working in 2.0.

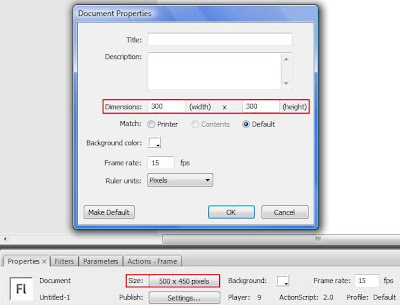
1. Okay, first we need to open Flash and set the Stage Dimensions to 300x300 by clicking on the Size button in the Properties panel.


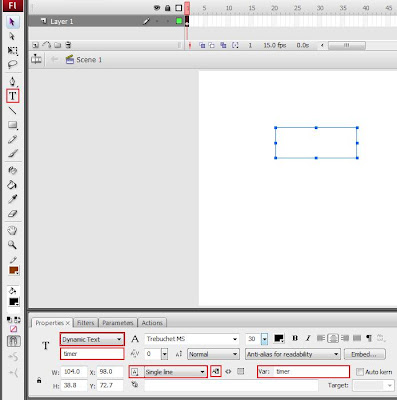
2. Now, select the Text Tool (T) and drag out a Dynamic Text Box. Change the following:
Text Type: Dynamic
Instance Name: "timer"
Variable: "timer"
Line Type: Single
Selectable: NO


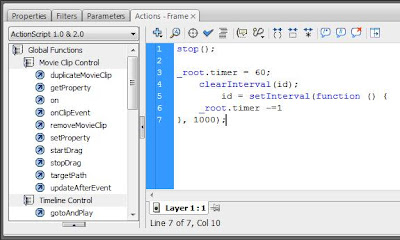
3. We now need to add the ActionScript. Deselect everything (Shortcut: Ctrl+Shft+A) and open up the Actions panel (Shortcut: F9). Paste the following:
stop();

_root.timer = 60;
clearInterval(id);
id = setInterval(function () {
_root.timer -=1
}, 1000);

Explanation:
stop(); - stops the main timeline on the current frame
_root.timer = 60; - the timer starts at 60
_root.timer -=1},1000); - time in Flash works in milliseconds, so this decreases (-=) the timer by 1 every one thousand milliseconds (one second).


4. Test your movie (Shortcut: Ctrl+Enter). The timer will count down from 60 seconds. If you want to change the time it counts down from, change the line:
_root.timer = 60;

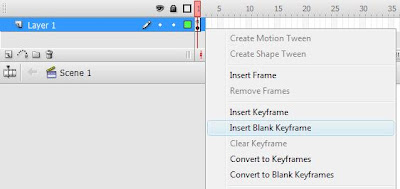
5. So the timer counts down, but what happens when it hits zero? -1...-2...-3... Not very helpful! Now you can make anything happen when the timer hits zero, but we're going to make it go to the next frame. So create a blank keyframe after the one you are working on. Put what you want on the frame, I'm going to write a piece of text denoting that the movie should start here. Remember to delete the timer if you created a normal Keyframe.


6. Add stop(); to the frame to ensure that it stops on the next frame if you want it to. Now go back to the first frame and create a new Symbol (Shortcut: Ctrl:F8), select MovieClip. Use the Rectangle Tool (Shortcut: R) to draw a small square. The design of this does not really matter because it will later be hidden off stage.


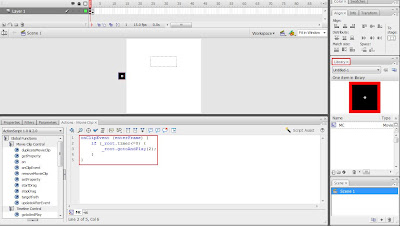
7. Hit the small blue arrow underneath the timeline to the left to return to the main timeline. Open up your Library (Shortcut: Ctrl+L), locate the square and drag it onto the stage. Then select it, open up the Actions panel and paste the following code:
onClipEvent(enterFrame){
if(_root.timer <= 0){
_root.gotoAndPlay(2);
}
}

Explanation:
if(_root.timer <0)- if the timer is less than or equal to 0
_root.gotoAndPlay(2); - the main timeline should go to the 2nd frame


8. If you wish you can drag the square off the stage so it does not appear when you publish the movie. Hit Ctrl+Enter to test the movie. When the timer hits zero, it will display the 2nd frame.


free counters