.jpg)
How to create walls to use with movieclips using very simple ActionScript.
1. Open Flash and create a New Document.
2. Use the Rectangle Tool (R) and draw out a square (50x50 pixels).
3. Select it using the Selection Tool (V) and then Convert it to a Symbol (F8). Name it "square", make it a MovieClip and the Registration centred. Now, with the square selected, open up the Properties panel and give it an Instance Name of "square".
4. Next, open up the Actions panel (F9) and enter the following ActionScript:
onClipEvent(enterFrame){
if(Key.isDown(Key.RIGHT)){
this._x += 10;
}
if(Key.isDown(Key.LEFT)){
this._x -= 10;
}
if(Key.isDown(Key.UP)){
this._y -= 10;
}
if(Key.isDown(Key.DOWN)){
this._y += 10;
}
}
Explanation
if(Key.isDown(Key.RIGHT)){ - if the Right Arrow key is pressed
this._x += 10; - move the square 10 pixels to the right
._x + - ...is the horizontal axis, so if you move along the x-axis in a positive direction, you move to the right
._y - - the y-axis is different on Flash (don't ask why!) so if you move along the y-axis in a negative direction, you move upwards and vise versa.
5. Now you need to create the walls. You can use any kind of shape for this but it much simpler to use lines. Select the Line Tool (N) and draw out a square. You could also use the Rectangle Tool to draw the square and then delete the fill.
6. You now need to make each wall a MovieClip. First select the top wall and hit F8 to convert it to a symbol. Name it "WallTop", leave the Type as MovieClip and the Registration as centred. Do the same for "WallBottom", "WallLeft" and "WallRight".
7. Enter the following Actionscript to each individual wall:
WallTop
onClipEvent(enterFrame){
if(this.hitTest(_root.square)){
_root.p1._y += 10;
}
}
WallBottom
onClipEvent(enterFrame){
if(this.hitTest(_root.square)){
_root.p1._y -= 10;
}
}
WallLeft
onClipEvent(enterFrame){
if(this.hitTest(_root.square)){
_root.p1._x += 10;
}
}
WallRight
onClipEvent(enterFrame){
if(this.hitTest(_root.square)){
_root.p1._x -= 10;
}
}
Explanation
if(this.hitTest(_root.square)){ - if the square touches 'this', the top wall in this case
_root.p1._y += 10; - move the square down 10 pixels
This works because the wall is pushing the square away at the same rate that the square is moving. If you were to increase the speed of the square to 11, it would slowly, but eventually, move through the wall. So if you plan to change the speed of the square, make sure you also change the value of the wall's pushing force.
8. Test your movie (Ctrl+Enter).
If you want the walls to be invisible just change the colour to match the background.
Have fun!
Friday, 6 February 2009
Flash - Water Droplet
How to create an authentic looking water droplet using masks and filters.
1. Open Flash and create a New Document.
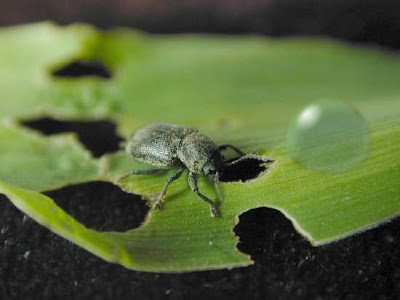
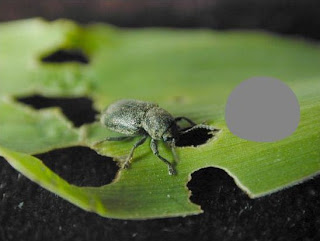
2. Find a picture you want to use as your background. I am using this picture of a leaf. Import it into the Library and then drag it onto the stage. Adjust the stage size so that it is the same size as the picture and then ensure that the picture is centred on the stage (Ctrl+K then align). Name the layer "Bkg".
3. Create a new layer called "Mask". On this layer you need to draw the water droplet. I used the Oval Tool to create a circle then squashed the bottom.
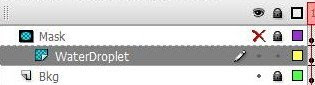
4. Select the droplet you just made and copy it. Create a new layer called "WaterDroplet" and paste the droplet in place (Ctrl+Shft+V). Drag the "WaterDroplet" layer so that it is in between the "Mask" layer and the "Bkg" layer.
5. Right-click on the "Mask" layer and click 'Mask'. Then hide the "Mask" layer, unlock the "WaterDroplet" layer and lock the "Bkg" layer.
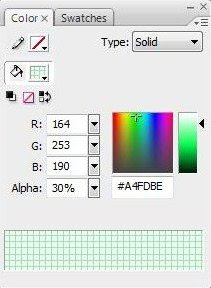
6. You now need to add some colour to the droplet. The colour you choose is important in making it look realistic. Select the droplet on the "WaterDroplet" layer you have just unlocked. Determine the root colour of the background underneath the droplet. So, in this example it will be a bright green (settings shown in image below). Fill the droplet with the Paint Bucket Tool (K) with the colour selected. Now reduce the Alpha to 30%.
7. Convert the droplet to a movieclip (F8) and then name it "Droplet".
8a. Now we are going to apply several filters to make it look like water. First, add a Bevel with the following settings:
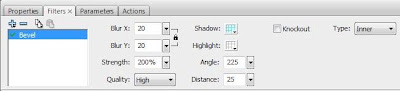
Blur X: 20
Blur Y: 20
Strength: 200%
Quality: High
Shadow: #66CC00 (Alpha: 50%) THIS ALSO NEEDS TO BE A SIMILAR COLOUR TO THE BACKGROUND!
Highlight: #FFFFFF (Alpha: 0%)
Angle: 225
Distance: 25
Type: Inner
8b. Add another Bevel.
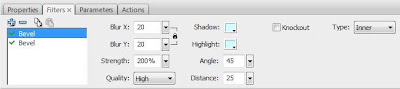
Blur X: 20
Blur Y: 20
Strength: 200%
Quality: High
Shadow: #CCFFFF
Highlight: #CCFFFF
Angle: 45
Distance: 25
Type: Inner
8c. Then add a Drop Shadow.
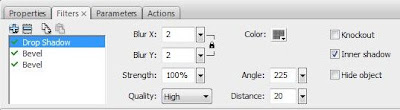
Blur X: 2
Blur Y: 2
Strength: 100%
Quality: High
Colour: #000000 (Alpha: 50%)
Angle: 225
Distance: 20
Inner Shadow: YES
8d. And another.
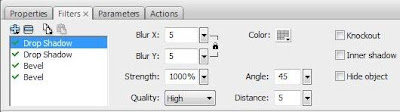
Blur X: 5
Blur Y: 5
Strength: 1000%
Quality: High
Colour: #000000 (Alpha: 25%)
Angle: 45
Distance: 5
9. Add a small oval onto the water droplet in the same direction as the light source and angle it appropriately. Fill it with a Radial Fill (White - Alpha: 100% & White - Alpha: 0%). Convert it into a movieclip and give it a High quality Blur of 5 for X and Y. Place it on the "WaterDroplet" layer above the water droplet itself.
10. There you have it, a nice looking water droplet! I have also added a slight blur on top of the previous filters to give it a softer edge. If you do this you will also need to make the droplet on the "Mask" layer slightly larger so that the blur isn't cut off.


1. Open Flash and create a New Document.
2. Find a picture you want to use as your background. I am using this picture of a leaf. Import it into the Library and then drag it onto the stage. Adjust the stage size so that it is the same size as the picture and then ensure that the picture is centred on the stage (Ctrl+K then align). Name the layer "Bkg".
3. Create a new layer called "Mask". On this layer you need to draw the water droplet. I used the Oval Tool to create a circle then squashed the bottom.

4. Select the droplet you just made and copy it. Create a new layer called "WaterDroplet" and paste the droplet in place (Ctrl+Shft+V). Drag the "WaterDroplet" layer so that it is in between the "Mask" layer and the "Bkg" layer.
5. Right-click on the "Mask" layer and click 'Mask'. Then hide the "Mask" layer, unlock the "WaterDroplet" layer and lock the "Bkg" layer.

6. You now need to add some colour to the droplet. The colour you choose is important in making it look realistic. Select the droplet on the "WaterDroplet" layer you have just unlocked. Determine the root colour of the background underneath the droplet. So, in this example it will be a bright green (settings shown in image below). Fill the droplet with the Paint Bucket Tool (K) with the colour selected. Now reduce the Alpha to 30%.

7. Convert the droplet to a movieclip (F8) and then name it "Droplet".
8a. Now we are going to apply several filters to make it look like water. First, add a Bevel with the following settings:

Blur X: 20
Blur Y: 20
Strength: 200%
Quality: High
Shadow: #66CC00 (Alpha: 50%) THIS ALSO NEEDS TO BE A SIMILAR COLOUR TO THE BACKGROUND!
Highlight: #FFFFFF (Alpha: 0%)
Angle: 225
Distance: 25
Type: Inner
8b. Add another Bevel.

Blur X: 20
Blur Y: 20
Strength: 200%
Quality: High
Shadow: #CCFFFF
Highlight: #CCFFFF
Angle: 45
Distance: 25
Type: Inner
8c. Then add a Drop Shadow.

Blur X: 2
Blur Y: 2
Strength: 100%
Quality: High
Colour: #000000 (Alpha: 50%)
Angle: 225
Distance: 20
Inner Shadow: YES
8d. And another.

Blur X: 5
Blur Y: 5
Strength: 1000%
Quality: High
Colour: #000000 (Alpha: 25%)
Angle: 45
Distance: 5
9. Add a small oval onto the water droplet in the same direction as the light source and angle it appropriately. Fill it with a Radial Fill (White - Alpha: 100% & White - Alpha: 0%). Convert it into a movieclip and give it a High quality Blur of 5 for X and Y. Place it on the "WaterDroplet" layer above the water droplet itself.
10. There you have it, a nice looking water droplet! I have also added a slight blur on top of the previous filters to give it a softer edge. If you do this you will also need to make the droplet on the "Mask" layer slightly larger so that the blur isn't cut off.
Flash - Countdown Timer
Flash - Countdown Timer
This is my first Flash tutorial. It will teach you how to create a timer that can be used within many aspects of Flash. Here we will be using it to count down to 0 then the movie will play.

This is my first Flash tutorial. It will teach you how to create a timer that can be used within many aspects of Flash. Here we will be using it to count down to 0 then the movie will play.
Just as a note for any future Flash tutorial posts: I work on Adobe Flash CS3 Professional and I code in ActionScript2.0. Unless told otherwise, presume I am working in 2.0.
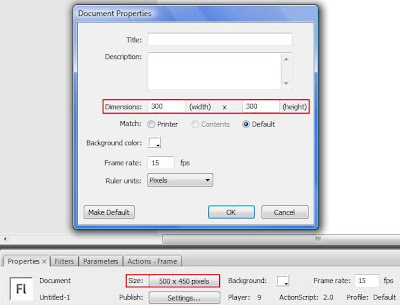
1. Okay, first we need to open Flash and set the Stage Dimensions to 300x300 by clicking on the Size button in the Properties panel.
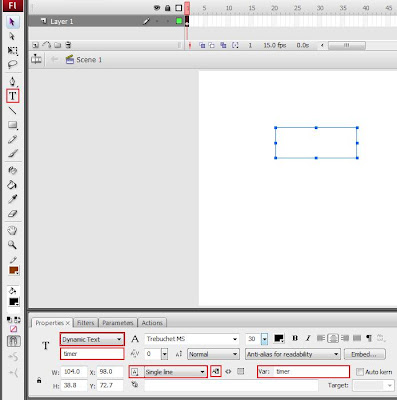
2. Now, select the Text Tool (T) and drag out a Dynamic Text Box. Change the following:
Text Type: Dynamic
Instance Name: "timer"
Variable: "timer"
Line Type: Single
Selectable: NO
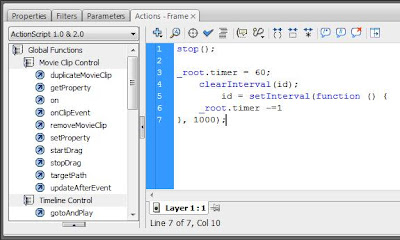
3. We now need to add the ActionScript. Deselect everything (Shortcut: Ctrl+Shft+A) and open up the Actions panel (Shortcut: F9). Paste the following:
stop();
_root.timer = 60;
clearInterval(id);
id = setInterval(function () {
_root.timer -=1
}, 1000);
Explanation:
stop(); - stops the main timeline on the current frame
_root.timer = 60; - the timer starts at 60
_root.timer -=1},1000); - time in Flash works in milliseconds, so this decreases (-=) the timer by 1 every one thousand milliseconds (one second).
4. Test your movie (Shortcut: Ctrl+Enter). The timer will count down from 60 seconds. If you want to change the time it counts down from, change the line:
_root.timer = 60;
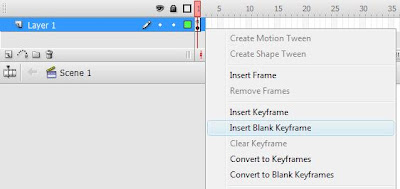
5. So the timer counts down, but what happens when it hits zero? -1...-2...-3... Not very helpful! Now you can make anything happen when the timer hits zero, but we're going to make it go to the next frame. So create a blank keyframe after the one you are working on. Put what you want on the frame, I'm going to write a piece of text denoting that the movie should start here. Remember to delete the timer if you created a normal Keyframe.
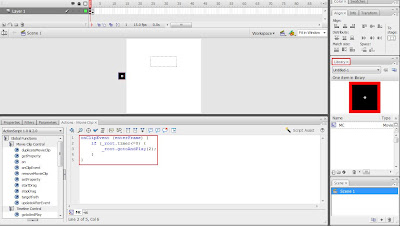
6. Add stop(); to the frame to ensure that it stops on the next frame if you want it to. Now go back to the first frame and create a new Symbol (Shortcut: Ctrl:F8), select MovieClip. Use the Rectangle Tool (Shortcut: R) to draw a small square. The design of this does not really matter because it will later be hidden off stage.
7. Hit the small blue arrow underneath the timeline to the left to return to the main timeline. Open up your Library (Shortcut: Ctrl+L), locate the square and drag it onto the stage. Then select it, open up the Actions panel and paste the following code:
onClipEvent(enterFrame){
if(_root.timer <= 0){
_root.gotoAndPlay(2);
}
}
Explanation:
if(_root.timer <0)- if the timer is less than or equal to 0
_root.gotoAndPlay(2); - the main timeline should go to the 2nd frame
8. If you wish you can drag the square off the stage so it does not appear when you publish the movie. Hit Ctrl+Enter to test the movie. When the timer hits zero, it will display the 2nd frame.
Subscribe to:
Posts (Atom)
.jpg)